Aion 2 Cleric Guide: complete PvE build (skills, stigmas, gear)
Aion 2 Cleric PvE guide: specializations for every skill, heals, passives, stigma builds, stats, gear, Arcanas, Genus Insight, Daevanion and macro.
 by Iruminati
Introduction: the Cleric playstyle
Want to play Cleric in Aion 2 and be the best player in your group?
This Aion 2 Cleric guide gathers the whole build, step by step: playstyle, specialization of every skill, heals, passives, stigma builds, target stats, gear, Arcanas, Genus Insight, Daevanion and macro.
This guide is 100% PvE. The Cleric PvP build is coming soon to the site.
The Cleric is the healer of Aion 2. Its heals go off instantly, and it keeps good damage between two heals.
- +Instant heals, no cast time
- +Huge source of PvE Damage Tolerance for the group
- +Good damage for a healer
- +Complete kit: resurrection, immunity, shield
- −Very dependent on Critical Hit
- −Sensitive to latency
- −Mana management in long fights
Good to know before you start:
- The Cleric is a critical-hit class. Condemnation, Bolt and its two main passives rely on it. Details are in the crit section.
- Some thresholds are mandatory. Several skills only become truly effective at a specific level. Details are in each card below.
Why the Cleric needs crit
4 parts of the kit rely on critical hits:
- Condemnation: its cooldown (3 s) is reset on every critical hit. Aim for 100% crit on this skill.
- Bolt: its red line gives it a guaranteed crit.
- Earth’s Grace: increases your Critical Damage Boost. A priority passive on gear.
- Empyrean Lord’s Grace: increases your Critical Hit and Double Chance, and deals bonus damage (once per second). It makes up about 8% of your damage.
Understanding specializations
Each skill has 5 specialization lines, identified by a color: green, blue, yellow, orange and red. They unlock with the skill level.
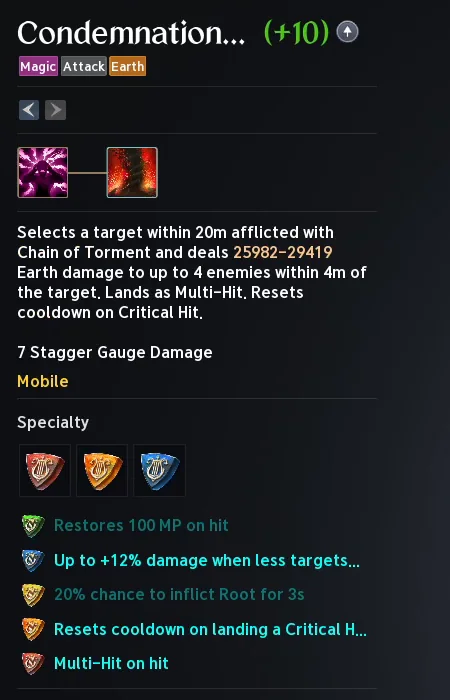
- Level 8: lines 1 to 3, 1 specialization
- Level 12: 4th line, 2 specializations
- Level 16: 5th line unlocked
- Level 20: 3 specializations
How do you get a main skill to level 20? You add up 4 sources:
| Source | Levels gained |
|---|---|
| Base level | 10 |
| Daevanion | +4 |
| Arcanas | +4 |
| Gear (rings) | +2 |
| Total | 20 |
Remember this rule: 4 points in Daevanion, 4 points in Arcanas, 2 points on gear. It applies to the 2 main skills: Condemnation and Radiant Recovery.
Two other skills will reach level 20 eventually, with no rush: Divine Aura and Bolt.
Damage skills
For each skill, here are the specializations to enable depending on its level. The color dot shows the matching line in the game.
 CondemnationMain skill
 Condemnation
Your number 1 damage skill. It can only be cast on a target hit by Chain of Torment. Take it to level 20.
 +12% damage (few targets)
 Reset on crit+12% damage (few targets)Reset on crit+12% damage (few targets)
 Multi-Hit
The orange line is the most important one in the whole kit: every crit makes the skill available again. Multi-Hit comes last, its gain is moderate.
Judgment ThunderImportant
 Judgment Thunder
The early game priority. Get it to level 16 as fast as possible, from your first dungeons. No need to go to level 20.
+12% damage (few targets)+12% damage (few targets)?Your choiceDivine Punishment ×2+12% damage (few targets)The red line triggers Divine Punishment, the chained hit, a 2nd time. The damage lands twice with no extra animation: close to +50% DPS on this combo.
Bolt
 Bolt
BoltA big charged skill (3 charge levels). Level 16 is enough, level 20 will come later.
 +30% Skill Speed+30% Skill Speed+20% damage (few targets)+30% Skill Speed+20% damage (few targets)Guaranteed crit
The yellow line is essential: if an ally takes damage during the charge, you switch back to healing faster.
Divine Aura
 Divine Aura
A stationary aura that hits the target for 8 s. Take it to level 20 eventually, after Judgment Thunder and Condemnation.
+50% attack speed+3 s duration+50% attack speed-10 s CD+3 s duration-10 s CD+3 s duration+50% attack speedOn paper, attack speed does not increase total damage. In combat, the aura can be destroyed: the faster it hits, the more hits it lands before it falls.
Chain of Torment
 Chain of Torment
The skill that opens Condemnation. Level 12 is enough. Level 20 is possible, but expensive for a small gain.
+3 s DoT+3 s DoT-10% enemy PvE Damage Tolerance+3 s DoT-10% enemy PvE Damage ToleranceIgnores block and evasionThe blue line extends the effect on the target: Condemnation stays available longer.
Debilitating Mark
 Debilitating Mark
A DoT (damage over time) to keep on the target at all times. If it is available, cast it: put it in the macro.
-15% enemy Defense-15% enemy Defense?Your choice-15% enemy DefenseIgnores block and evasion- Never skip the blue line: its effect on the target is huge.
- Level 12 is enough in late game: the skill then makes up less than 2% of your damage.
Earth’s Retribution
 Earth’s Retribution
Your left click. It has two uses: recovering mana and reducing Bolt’s cooldown. Level 12 is enough.
+20% Discharge trigger+20% Discharge trigger-7 s Bolt CD (on Discharge)Each Discharge reduces Bolt’s cooldown (45 s base). In 3 or 4 Discharges, the reduction adds up fast.
Healing skills
Outside of stigmas, the Cleric only has 3 healing skills. All of them go off instantly: heals come out extremely fast with this class.
Radiant RecoveryMain skill
 Radiant Recovery
The Cleric’s most important skill. It heals the whole group within 40 m, with no target to select, and removes 1 debuff. Get it to level 16 from your first dungeons, then to level 20.
+1 charge+1 charge-3 s CD+1 charge+5% HP restored+1 charge+5% HP restored-3 s CD- The red line is crucial. It restores an extra 5% of the target’s HP, boosted by your Heal Boost: about 9% around 2,600 Gear Score. It is what keeps your heals relevant as the group’s HP grows.
- The 3 lines reinforce each other: the extra charge and the shorter cooldown let you recast the skill very often.
- Ignore in PvE: the orange line (+10% incoming heal) and the green line (debuffs removed).
Light of Regeneration
 Light of Regeneration
A heal over time (30 s) for the whole group. Simple rule: if it is available, cast it. Take it to level 16.
 +5% Defense+5% Defense+5% movement speed+5% Defense+5% PvE Damage Tolerance+5% Defense+5% PvE Damage Tolerance+5% movement speed
Level 20 is a viable choice, but level 16 makes very little difference.
Healing Light
 Healing Light
The kit’s targeted heal. It heals the ally with the lowest HP. Level 12 is enough.
+2 charges+2 charges+2% HP restoredBoth lines combine: 3 charges of a very short heal to spam on an isolated ally. Put it on an easy-to-reach key (A by default).
Defiance
 Defiance
It removes crowd control and makes you immune to it for 5 s. No need to level it in PvE: avoid giving it Arcana levels.
Chains into Blessing of Regeneration+10% HP on activationPvE Damage Tolerance
The Cleric is the group’s main source of PvE Damage Tolerance. This stat directly reduces incoming damage.
Each point gained has more effect than the previous one. According to the patch notes, it would be capped at 80%.
Example: you start at 36.8%. With Light of Protection (+20%), Light of Regeneration (+5%) then Yustiel’s Power, you go past the cap. The group then takes very little damage.
Passives
Two passives dominate everything else: they are also the 2 passives to look for on gear and in Arcanas.
| Tier | Passive | What it gives |
|---|---|---|
| 0 |  Earth’s Grace Earth’s Grace | Critical Damage Boost and Accuracy. Priority on gear. |
| 0 |  Empyrean Lord’s Grace Empyrean Lord’s Grace | Critical Hit, Double Chance and bonus damage on each attack (once per second) |
| 1 |  Healing Enhancement Healing Enhancement | Heal Boost, based on your Attack |
| 2 |  Immortal Veil Immortal Veil | More Defense |
| 2 |  Warm Benediction Warm Benediction | More max HP |
| 2 |  Survival Willpower Survival Willpower | More Status Effect Resist |
| 2 |  Radiant Benediction Radiant Benediction | Passive heal |
| 2 |  Heal Block Heal Block | Chance to reduce the target’s incoming heals |
- Earth’s Grace and Empyrean Lord’s Grace should go as high as possible.
- The rest: spread your remaining points.
Stigmas
Stigmas are special skills that boost your character. At launch, you will only have 4 slots. Each stigma gains a line every 5 levels (5, 10, 15 and 20).
For the Cleric, almost every stigma is situational: you swap them depending on the content and your group. The recommended builds come right after the cards.
Yustiel’s Power
 Yustiel’s Power
Part of every build. +20% PvE Damage Tolerance for the group for 10 s. Cast it when you know the fight and can anticipate big damage. Take it to level 5: the gain is significant.
Light of Protection
 Light of Protection
A group aura: PvE Damage Boost, PvE Damage Tolerance, incoming heals and more. Essential without a Chanter in the group. Aim for level 15 for your first Ludra.
The +10% HP at level 15 makes the difference. A fragile class with 19,000 HP goes up to nearly 21,000 HP: enough to survive an attack that would have killed it.
Prayer of Amplification
 Prayer of Amplification
Keep it in almost every build. +35% Attack for 20 s, and your 2 Grace passives boosted. Since Heal Boost depends on Attack, it also boosts your heals.
Absolution
 Absolution
A group heal that removes debuffs. It only really takes off at level 15. Aim for at least level 5: at level 1, take it off your bar.
Summon Resurrection
 Summon Resurrection
For a group that dies often and wants to save its resurrection stones. Aim for level 5: without it, the 1 s cast discourages players, who use their stone without waiting.
Noble Aura
 Noble Aura
An offensive aura that follows the Cleric and attacks its target. Play it at level 1 or 5, or straight at level 20: in between, the gain is small. Points to spare? Put them into Prayer of Amplification instead.
Earth Punishment
 Earth Punishment
A DoT that guarantees Condemnation crits on the target, plus an Attack and Double Chance buff for the group. Its effect stays limited before levels 10 and 15. Put it in the macro.
Salvation
 Salvation
Your immunity: 3 s with no damage and no effects. It blocks most big hits, but not attacks meant to kill in one hit (bosses’ instant-death mechanics).
It is a crutch: take it only on content whose strategies you have not mastered yet.
Benevolence
 Benevolence
Leave it aside for now. It becomes excellent at level 15, but before that, its heals are weak and often land at the wrong time.
Power Burst and Assault Mark do not really have a place in PvE.
Stigma builds
Swap your stigmas depending on the content. The game lets you save several skill presets (tabs 1, 2 and 3 at the top of the skill window).
| Build | Stigmas | When to play it |
|---|---|---|
| Defensive | Yustiel’s Power, Summon Resurrection, Light of Protection, Absolution | Raid progression, group likely to die often |
| Defensive, solid group | Yustiel’s Power, Prayer of Amplification, Light of Protection, Absolution | Comfortable group that rarely dies |
| Offensive | Noble Aura, Prayer of Amplification, Yustiel’s Power, Light of Protection | Group that masters the fight, you want maximum damage |
- A Chanter in the group? In the offensive build, replace Light of Protection with Earth Punishment.
- Content you are discovering? Slot Salvation in place of a defensive stigma.
Target stats
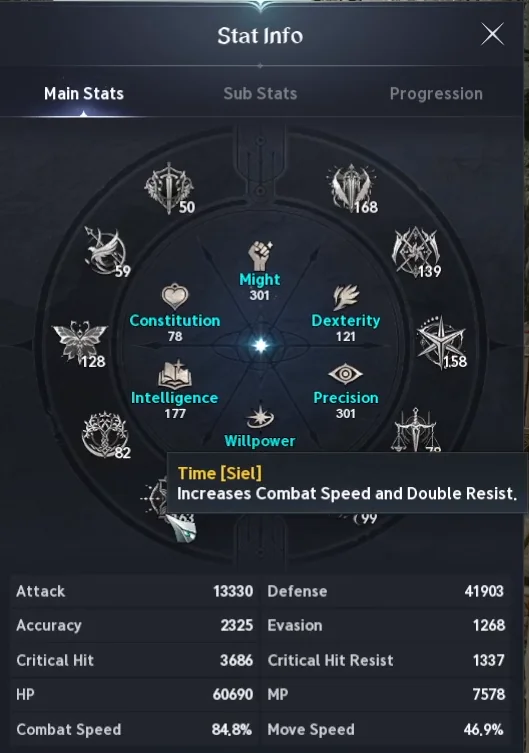
As with almost every class, Attack comes first. Look for plenty of Might: this stat increases your Attack by a percentage (Attack Increase). For the Cleric, Attack also increases your heals.
Then, 4 divine stats make the difference:
- Destruction [Zikel]: increases Attack.
- Wisdom [Lumiel]: increases Double Chance.
- Time [Siel]: increases Combat Speed.
- Illusion [Kaisinel]: reduces cooldowns, your buffs come back more often.
Where to find them? On Pantheon artworks and on abyssal bracelets.
Finally, keep an eye on your Critical Hit: the goal is to crit on almost every Condemnation.
Gear
Each piece has random stats: Soul Binding. On armor and jewelry, the last line is a choice between Critical Hit and Earth’s Grace.
Critical Hit or Earth’s Grace?
It all depends on your crit rate:
- You do not crit every time yet (on Ludra, for example): take Critical Hit.
- You almost always crit: stop stacking Critical Hit and take Earth’s Grace, which increases your crit damage.
The two stats reinforce each other: look for a balance.
In the table, passives are in purple and active skills in blue.
Soul Binding by gear piece
| Piece | Recommended lines | Last line |
|---|---|---|
| Mace (weapon) | Might, Precision, Combat Speed, Weapon Damage Boost, Damage Boost | – |
| Guard (off-hand) | Might, Precision, Combat Speed, Weapon Damage Boost, Damage Boost | – |
| Helmet | Double Chance, Attack Increase, Attack, Incoming Heal | Critical Hit or Earth’s Grace |
| Pauldrons | Defense Increase, Critical Damage Boost, Attack, Double Chance | Critical Hit or Earth’s Grace |
| Chest | Damage Boost, Defense Increase, Perfect Chance, Attack | Critical Hit or Earth’s Grace |
| Legs | Damage Tolerance, Attack Increase, Perfect Chance, Attack | Critical Hit or Earth’s Grace |
| Gloves | Combat Speed, Defense Increase, Perfect Chance, Attack | Critical Hit or Earth’s Grace |
| Cloak | Double Chance, Attack Increase, Attack, Critical Hit | Earth’s Grace |
| Boots | Movement Speed, Defense Increase, Attack, Perfect Chance | Critical Hit or Earth’s Grace |
| Earrings (×2) | Attack, Might, Precision, Movement Speed | Critical Hit or Earth’s Grace |
| Necklace | Attack, Might, Precision, Combat Speed | Critical Hit or Earth’s Grace |
| Rings (×2) | Might, Precision | The skills your build is missing |
| Abyssal bracelets (×2) | Illusion [Kaisinel], Time [Siel], Wisdom [Lumiel], Destruction [Zikel] | – |
- Rings: the most flexible part of your gear. First get your Arcanas to +5, then use the rings to fill in the missing skill levels.
- Amulet and belt: not important.
See every possible Soul Binding stat by gear piece (image)
Manastones
On Superior Manastones, aim for the Ultimate tier:
- Damage Boost +100
- Weapon Damage Boost +100
- Critical Damage Boost +100
No Ultimate line? The best alternative is Attack +10.
Theostones
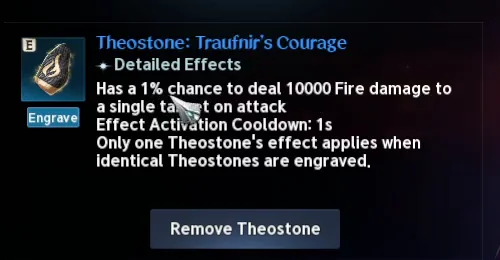
The differences between Theostones are small. The best option: any Theostone with a 1% chance to deal big damage.
Example: Traufnir’s Courage, 1% chance to deal 10,000 fire damage.
Arcanas
Arcanas give a divine stat and skill or passive levels. The goal: as many levels as possible on Radiant Recovery and Condemnation, and +4 on your 2 Grace passives. All cards are at +5.
Skills to look for on each card
Levels drop at random: you will have to adapt. Here are the skills to aim for on each card.
| Card | Divine stat | Sub-skills to aim for |
|---|---|---|
| Chalice of Vigor (Grail) | Time [Siel] | Radiant Recovery, Divine Aura, Condemnation (if not level 20 yet), Light of Regeneration, Chain of Torment |
| Parchment of Vigor | Life [Yustiel] | Radiant Recovery and Condemnation first, then Debilitating Mark, Chain of Torment |
| Compass of Magic | Death [Triniel] | Judgment Thunder +2 and Light of Regeneration +2 (no more), the rest into Divine Aura |
| Bell of Magic | Destruction [Zikel] | Empyrean Lord’s Grace +4, then Immortal Veil, Warm Benediction, Survival Willpower |
| Mirror of Magic | Wisdom [Lumiel] | Earth’s Grace +4, then Healing Enhancement, Radiant Benediction, Heal Block |
- Compass: Judgment Thunder and Light of Regeneration only need level 16. Avoid levels on Defiance: they would be wasted.
- Bell and Mirror: only the Grace passive really matters. The other levels can land anywhere among the listed passives.
- Set bonuses: they have very little impact. Pick your cards for the divine stat they give.
Wings
Two choices, depending on your goal:
| Wings | Main effect (equipped) |
|---|---|
| Forest Spirit Wings | Boss Damage Boost and Boss Attack |
| Dark Veil Wings | Damage Boost and Attack Bonus |
Genus Insight
Genus Insight is filled family by family (Cogni, Fera, Natura, Varian and Special). Each family has 9 slots, with the same pattern (except slot 4, specific to each family):
| Slot | Stat to take |
|---|---|
| 1 | Attack Bonus (otherwise Critical Attack or PvE Attack) |
| 2 | HP increase |
| 3 | Critical Hit (Accuracy if you lack it) |
| 4 | Depends on the family: Cogni Critical Damage Boost, Fera Weapon Damage Boost, Natura Perfect Chance or Multi-hit Chance, Varian Back Attack Damage Boost, Special Double Chance |
| 5 | Attack Bonus (otherwise Critical Attack or PvE Attack) |
| 6 | Critical Hit |
| 7 | Critical Hit |
| 8 | HP increase |
| 9 | Critical Hit (Accuracy if you lack it) |
Pantheon
For artworks, always aim for the same 4 stats: Wisdom, Destruction, Time and Illusion. Life and the other stats are not a priority.
For statues, use what you have. The Kromede and Zikel statues are a priority for the stats they give.
Daevanion
Daevanion adds skill levels: +4 on each skill. Take all the golden nodes, starting with the key skills and passives.
| Skill | Daevanion bonus to aim for |
|---|---|
| Condemnation, Radiant Recovery, Judgment Thunder | +4 first |
| All other active skills | +4 |
| Earth’s Grace and Empyrean Lord’s Grace | +4 first |
| All other passives | +4 |
Rotation and macro
The skill chain
The macro handles your damage. Place your skills in 2 rows. The order matters.
- Row 1: Prayer of Amplification, Chain of Torment, Condemnation, then Judgment Thunder.
- Row 2: Debilitating Mark, then Earth Punishment.
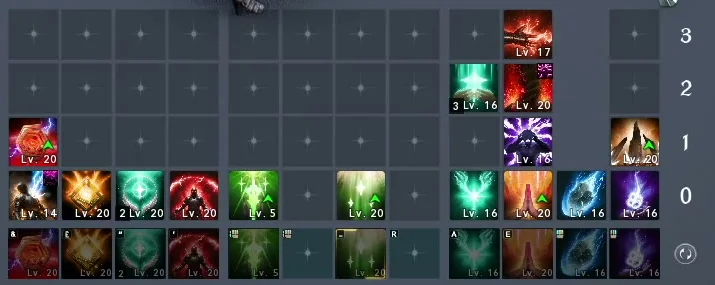
DoTs and damage buffs go off as soon as they are ready. Then Condemnation and Judgment Thunder compete to be cast: Condemnation goes off as soon as its crit has reset it.
The in-game macro
The in-game macro holds the head of each row: Prayer of Amplification then Debilitating Mark, with a 10 ms delay.
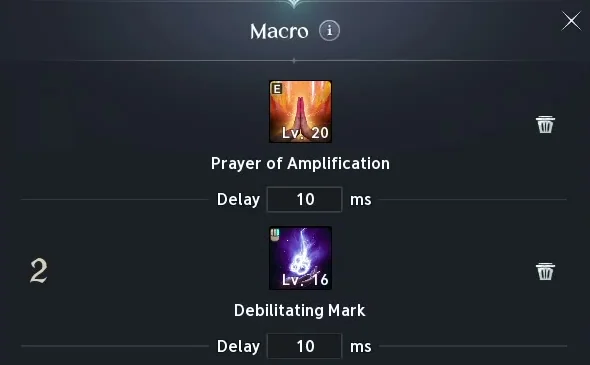
Do not forget to bind a key to the macro in the game options.
How to play
- Hold the macro key: this is what deals the most damage.
- Heal manually: Radiant Recovery, Light of Regeneration and Healing Light. Bolt is also cast manually.
- Long fight and mana running low? Also hold left click (Earth’s Retribution). It slots in between skills (« weaving ») and restores mana, at the cost of a little damage.
Bonus option: the mouse macro
Do you have a Logitech mouse, or any mouse with macro software? In your software (G Hub for example), bind the in-game macro key to right click. You then just hold right click down.
More details on macros in the Aion 2 Bible.
Conclusion
The Cleric heals fast, protects the group and keeps good damage thanks to crit.
Key points to remember:
- Judgment Thunder at level 16 from the start, then Condemnation and Radiant Recovery at level 20.
- Earth’s Grace and Empyrean Lord’s Grace first on gear, Arcanas and passives.
- Aim for 100% crit on Condemnation, then switch to Earth’s Grace.
- Yustiel’s Power and Light of Protection in almost all your stigma builds.
- Might, Destruction, Wisdom, Time and Illusion as target stats.
FAQ
What are the Cleric’s main skills in Aion 2?
Condemnation and Radiant Recovery, to take to level 20. Judgment Thunder at level 16 is the early game priority. Divine Aura and Bolt will reach level 20 eventually.
Which stigmas should the Cleric take in PvE?
Yustiel’s Power and Light of Protection almost always. Add Prayer of Amplification, Absolution or Summon Resurrection depending on your group. In an offensive build, take Noble Aura.
Why does the Cleric need crit?
Every crit resets the cooldown of Condemnation, its best damage skill. Its two main passives, Earth’s Grace and Empyrean Lord’s Grace, are also tied to crit.
How do you get a skill to level 20?
Start from base level 10. Add +4 from Daevanion, +4 from Arcanas and +2 from rings.