Corroded Decontamination Facility
Complete guide to the Corroded Decontamination Facility, Aion 2’s second 10-player raid: boss mechanics, attacks and clear strategies, by an expert player.
 by Iruminati
Introduction
Welcome to this guide on the Corroded Decontamination Facility, Aion 2’s second raid. It is designed for 10 players, with a minimum gearscore of 3500.
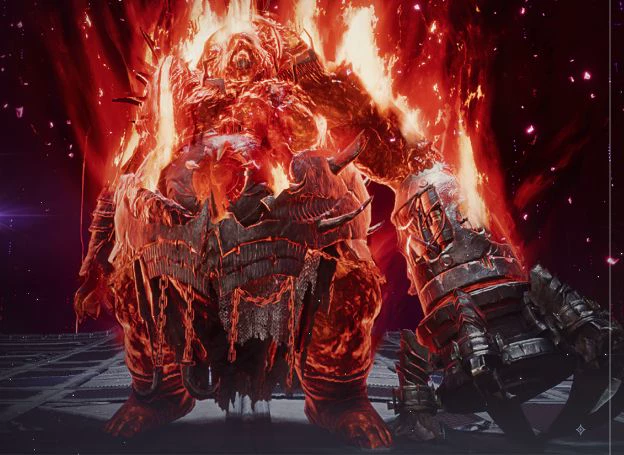
This encounter consists of 2 mini-bosses and a final fight against Terminator Bargott.
The bosses
Lots of poison: the real danger of the fight isn’t the boss’s raw damage, but the stacked poison damage and the main mechanic. You can use basic yellow potions to remove 1 poison stack, or crafted potions that remove 2. Healers must debuff the stacks regularly.
Preparation: for the main mechanic, you’ll need to use markers 1 to 8 to define the players and the order in which they’ll do the mechanic.
Like every boss in the game, it uses its attacks cyclically; the cycle is interrupted depending on the damage you deal, which triggers the main mechanics.
At 50% HP, the boss enters an « Enraged » state: a passive poison rain (untargeted) then falls across the whole arena.
In this fight, the boss uses its attacks in the order shown here.
Attack 1 : Poison rain
The boss rains poison on the players. You must spread out across the arena to avoid stacking several poisons in the same spot (one-shot risk). Each boss attack deals heavy damage and applies 1 poison stack. The attack is recognizable: the boss plants its mandibles into the ground then raises them into the air.
Attack 2 : Webs
The boss jumps to an edge of the arena, drops a poison zone under its feet and grabs every player to pull them toward the poisoned zone. You must run/dash the opposite way to avoid ending up in the zone.
Attack 3 : AoE
The boss does a half-circle attack, then an AoE over a very large area.
The following attacks only appear after the first mechanic (~75% HP).
Attack 4 : Laser
The boss fires a laser in front of it then turns through a 90° angle. There’s no way to know which way it will turn.
You can recognize this attack because the boss spins on itself before spitting the laser.
Attack 5 : Chase
The boss burrows and chases a player. Just kite until it comes back out. When it resurfaces, there’s an immediate AoE in front of and behind the boss.
Mechanic 1 : The stones (~80% and ~20%)
The boss summons stones and marks 4 players with numbers (visible above the character’s head). It then jumps on the players in numerical order. The numbered players must stand on the stones to break them. Goal: break the stones, but keep one stone alive. The boss then casts a one-shot AoE: players must hide behind the remaining stone.
Mechanic 2 : The Orbs (~50%)
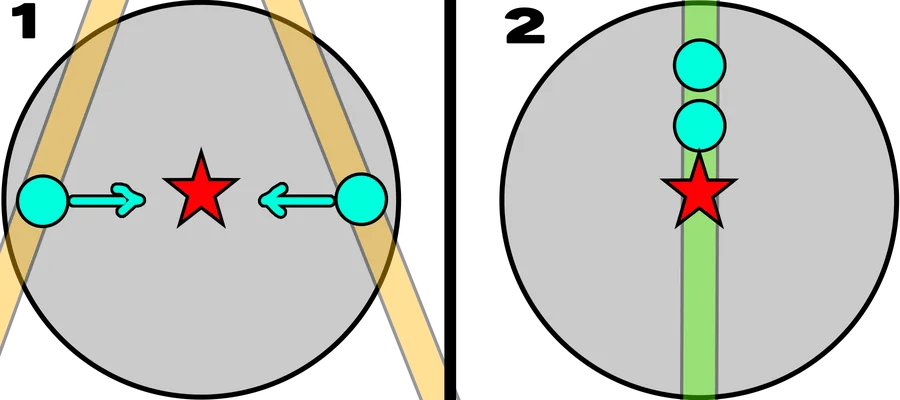
The boss teleports to the middle and spawns orbs around it. You must take the following placement:
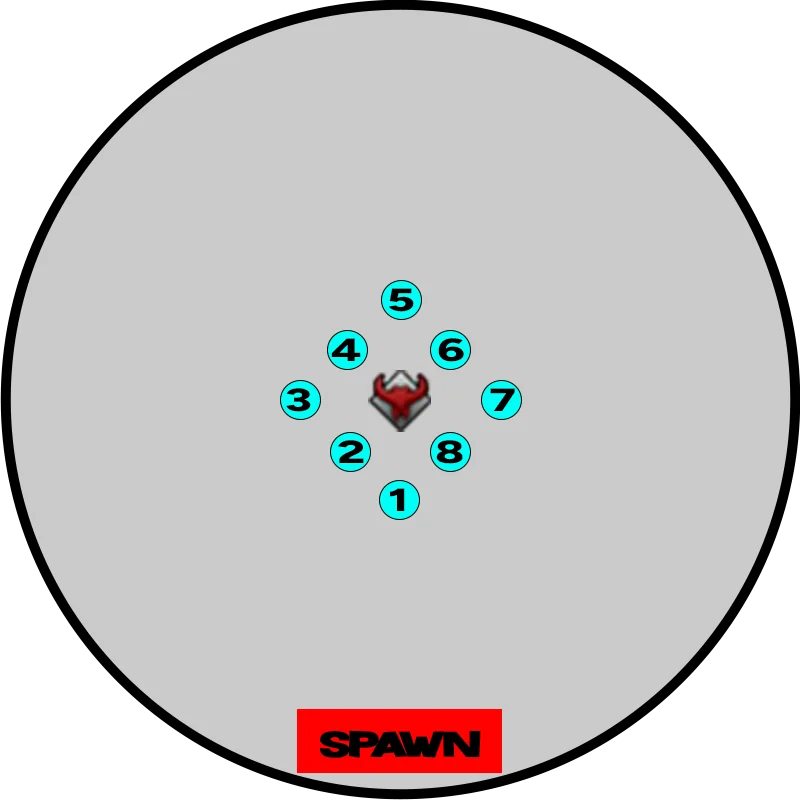
You then take the orbs in the order defined at the start of the dungeon (with the markers). Once an orb is taken, the other orbs temporarily turn orange. You must wait for the orb to turn purple again to take it. If two orbs are taken at the same time, heavy damage is dealt to the raid.
This boss hits very hard with its attacks and also has a bleed/poison mechanic that must be debuffed regularly.
You’ll also need to prepare a placement that looks like this:
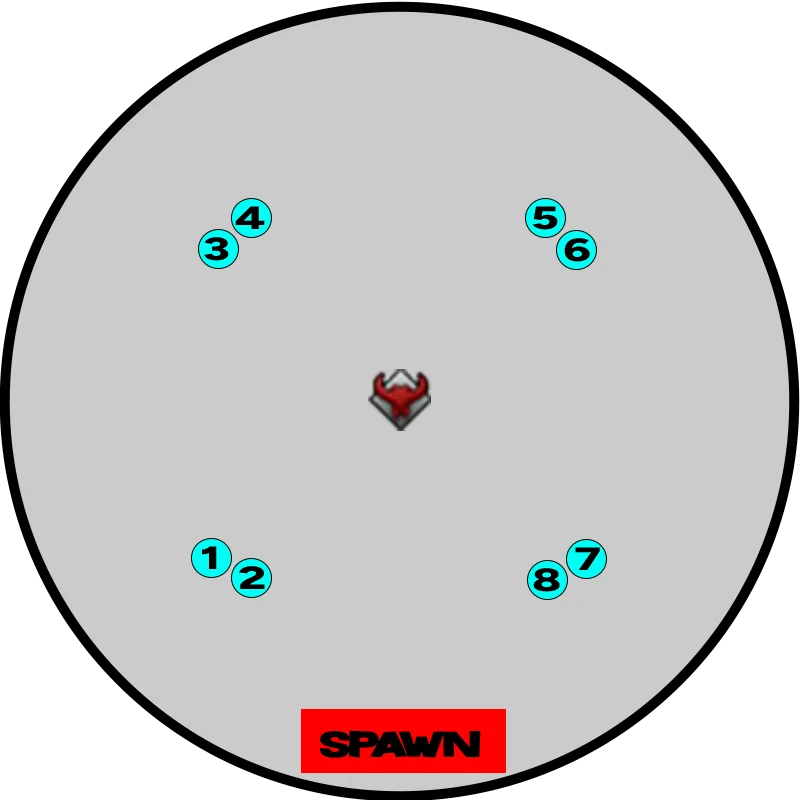
Ideally, mix the players so you have DPS/SUP or DPS/TANK pairs rather than DPS/DPS or SUP/SUP.
In this fight, the boss uses its attacks in the order shown here, with the same rotation until the end of the fight.
Attack 1 : Charge + Cone
The boss charges its target, dealing damage around it along the way, then turns 180° to do a wide damage cone.
Attack 2 : Zikel
The boss raises its hand with a purple aura, then throws 3 lines of attack. Then, every player between 15 and 30 meters generates an extra line on themselves; it is oriented according to the direction you input on your character during the 3 attacks (in front of and behind your character).
Attack 3 : Red eyes
The boss charges its fist downward then slams it into the ground. Two players get a red eye above their character (1 melee, 1 ranged). They’ll have an attack circle around them; once the attack goes off, that same zone becomes a safe zone for the next attack.
Attack 4 : Cross + Grab
The boss dashes onto a ranged player then does a cross attack. Then it targets a ranged player and does a large attack that hits very hard and pulls players into melee.
Attack 5 : In Out
This attack only appears after the boss has already done the first mechanic.
The boss does a series of 4 ranged circles that close in on it. If you get hit by an attack, the boss grabs you into melee. At the end of this attack, players with a purple debuff trigger a meteor of damage on themselves.
Mechanic 1 : Tentacles (~75% / ~20%)
The boss returns to the middle of the arena with a cross attack. Then red and purple tentacles appear all around the boss. The placement is ALWAYS the same.
Keep the placement you defined before the fight (overview).
The strategy is simple:
- The boss says a voiceline; the FIRST word of that voiceline is a color. Keep the announced color in mind.
- The boss fires a projectile at all players; dodge it (stay far enough from the boss so the projectile is easier to dodge).
- Pick up a tentacle on the ground matching the announced color, and you survive the one-shot AoE.
- The boss fires the projectile again.
- Pick up the last remaining tentacle.
Example: the boss says the following voiceline « Red blood bursts forth… »
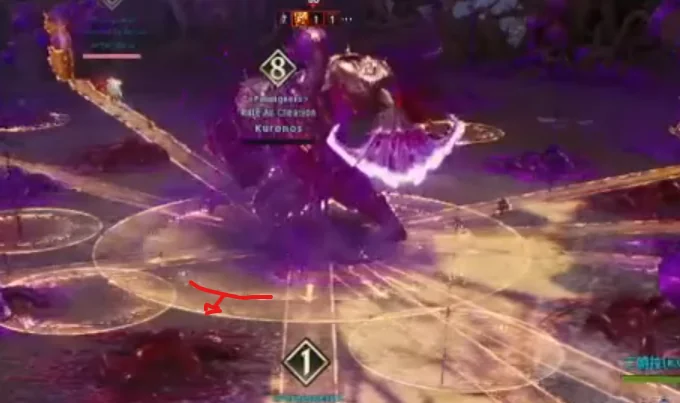
So you’ll pick up the RED tentacles first, then in the second part the PURPLE ones.
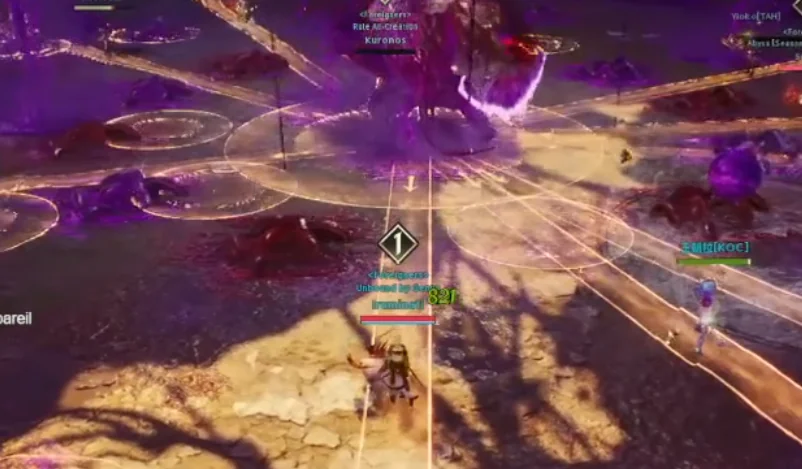
Mechanic 2 : Blue zone (~50%)
The boss returns to the center of the map with a CROSS attack. Take your initial placement again (overview).
Blue zones appear with a monster in the middle. This mechanic has several steps, repeated twice:
- Each player stands on the outside of the blue circle.
- When the boss’s attack goes off, move toward the inside to dodge.
- Go in front of the monster to absorb the boss’s projectile.
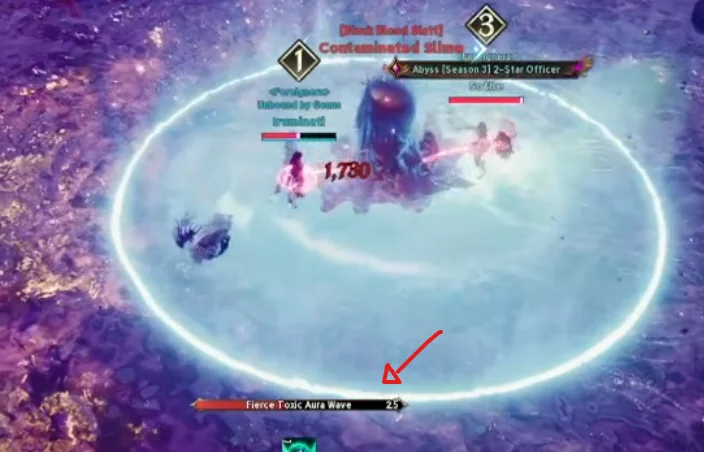
Then the boss casts an attack: the monster in the middle of the circle must die at 2 seconds or less on the timer to grant invulnerability during the boss’s AoE.
The player who absorbs the projectile should be the one with the least health, because the projectile puts the player back to full life. You can also tell exactly when attacks/projectiles will go off by watching the boss!
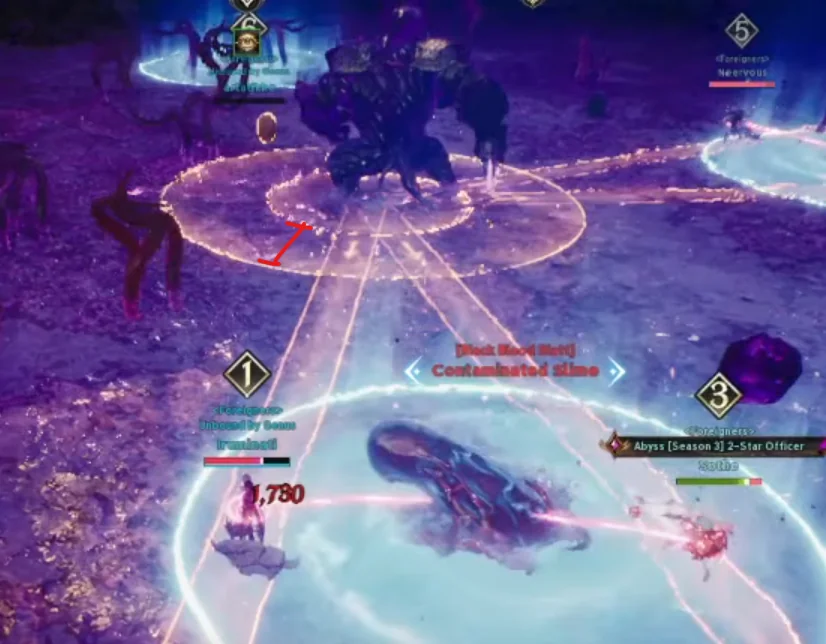
This boss inflicts a lot of burns, so you must play safe with Clerics/Aede who debuff the burn stacks regularly. You should also use yellow potions that remove a stack (2 for crafted potions).
After the first mechanic, hammers will fall on the arena tiles for the whole rest of the fight.
At 50% HP, the boss becomes « ignited »: its attacks are faster and hit harder.
Attack 1 : AoE
Bargott strikes 3 times with circular AoEs:
- the first in melee;
- the second also in melee, but extended;
- the last at range, with a safe zone in melee and at long range.
Attack 2 : Fire zone + Split Damage
Fire zone: The boss teleports to the center of the map and sends a Draupnir-type fire wave: you must jump over it. You then need to stick to the wall of the map to drop the fire zones as far as possible from the arena (there are 3 zones per player). You then need to run onto the boss as fast as possible for the next attack.
Split Damage: The boss does 3 attacks: the first to the boss’s left (so on the boss’s right hand), then the second on the other side, and the last in the center. You need a maximum of players in the zones so the damage split lets the raid survive. The player farthest from the boss gets grabbed during this attack (avoid it being a Cleric).
Attack 3 : Rolls
The boss does two rolls: the first toward the farthest player, the second toward the closest player. Then it does either the black holes attack or the shotgun.
Attack 4 : Laser
The boss taps its belly several times then fires a laser that deals a lot of damage. It does a 180° while firing the laser to one side or the other.
Attack 5 : Blind + Orbs
Bargott’s gauntlet has a blue aura: it jumps and detonates a blinding bomb on the ground. Turn your character so it isn’t facing Bargott to avoid the blind. Then the boss fires a large number of orbs that are easy to dodge by running to the left.
Attack 6 : Swords + Bombs
Some players get a red zone on them, spawning swords that spin around the character. You must go onto the bombs that appear on the map to remove them. If a player is hit by a sword, they get knocked back and take damage. Once the boss is enraged, it also spawns black bombs that blind players. You’ll have to avoid them.
Attack 7 : Black holes
The boss charges an attack at its belly then spawns 2 black holes on the map that stay for a fairly long time. They deal damage while pulling and slowing players.
Mechanic 1 : The bombs (~80% and ~25%)
The boss disappears and returns to the center of the map. Numbers appear above 8 players and bombs appear all over the arena. Bargott then rolls onto the players in order; the goal is to make it roll over every bomb to stay alive. There are 3 different bomb layouts:
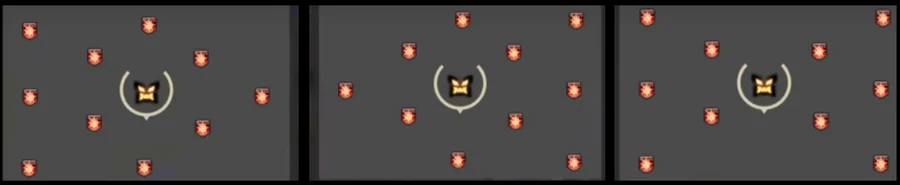
Fortunately, there are placements that guarantee victory whatever the layout:
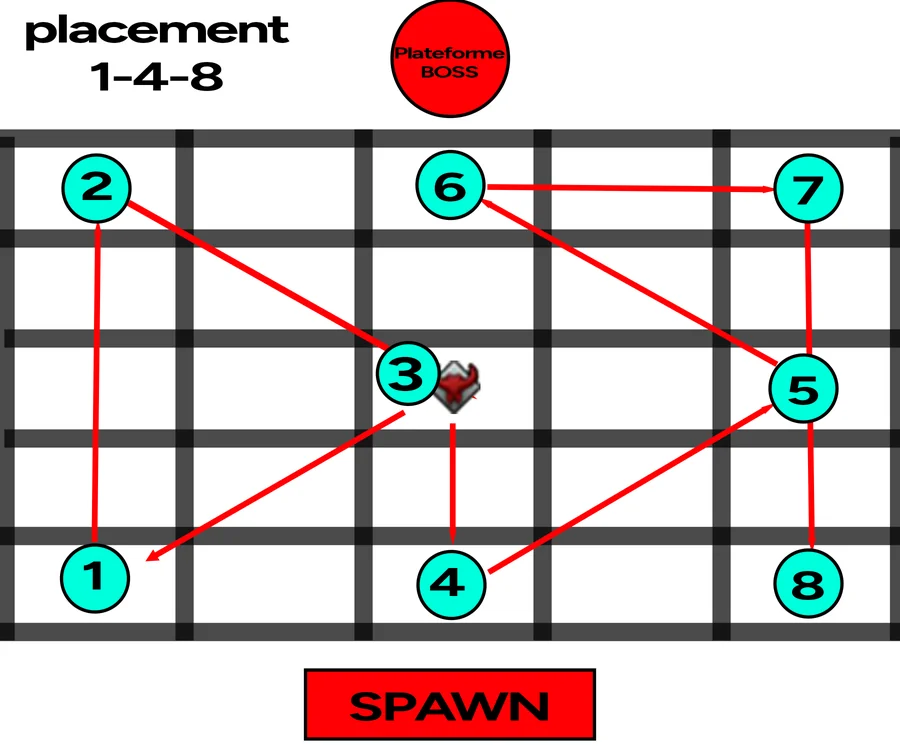
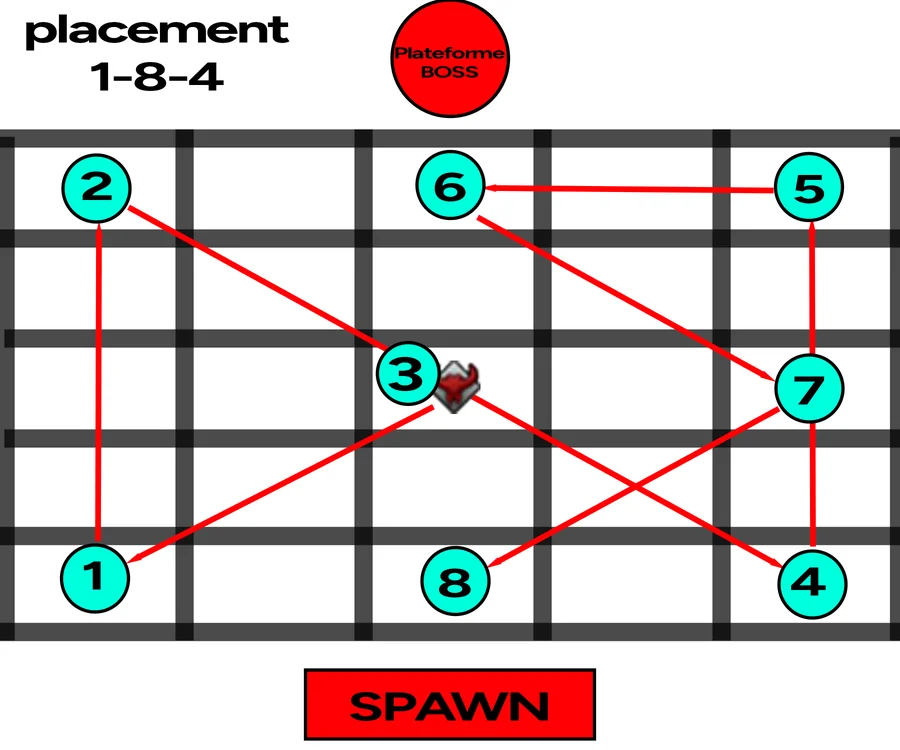
The process is then simple: the boss starts the mechanic, all players rush IN FRONT of the boss, check the number above their head, then take their spot on the map.
Mechanic 2 : The Platform (~50%)
The boss teleports to the platform behind the arena: it grabs all players then fires shotguns non-stop. Bombs pickable with the action key are scattered randomly on the map. You need to pick them up, return to the edge of the arena toward the boss, target it, then press the action key to send it the bomb. You must send 8 bombs to complete the mechanic.
Conclusion
Feel free to share this article around you to help with the site’s referencing, it’s important! 😀
FAQ
What combat power is recommended for this raid?
350K is the strict minimum; 450K is good to be comfortable.
What composition is best suited?
I recommend 2 Clerics, 2 Aede, 1 Templar and a mix of DPS.
What are the rewards?
8 heroic Sync Stones, 40 yellow Sync Stones, 40+ heroic and yellow amplification stone fragments, 8 million kinah, a wide range of items (with a chance to get heroic weapons, items or bracelets), and a chance to get golden crafting materials.
How much time should I plan for?
For a fast clear, the raid can be done in under 20 minutes. Otherwise, you have 2 hours maximum per attempt. If you fail, the ticket is not consumed.