Sanctuary of Ludra
Complete guide to the Sanctuary of Ludra, Aion 2’s first 10-player raid: boss mechanics, attacks and clear strategies, by an expert player.
 by Iruminati
Introduction
Welcome to this guide on the Sanctuary of Ludra, Aion 2’s first raid. It is designed for 10 players, with a minimum gearscore of 2700.
This encounter consists of 2 mini-bosses and a final fight against Ludra.
The bosses
The boss always uses the same attacks cyclically, and the main mechanics happen depending on the boss’s health bar. Depending on how long you take to kill it, it may do a different number of attacks.
From the first mechanic (80%, the red laser), a player gets a purple circle filling up around their character. When the circle completes, you’ll need at least 2 other players in the zone.
Otherwise, a purple puddle appears on the map. This zone deals heavy damage and slows players. It grows over time and, if 3 puddles are generated, the boss one-shots the whole map.
In this fight, the boss uses its attacks in the order shown here.
Attack 1 : Cross
A first cross on the boss’s cardinal points (north, south, east, west), followed by a second cross on the diagonals.
Attack 2 : 4 Circles
The boss takes its sword in both hands then does a series of 4 circles, starting in melee.
Attack 3 : Red stack
Red circles appear around the players, with a safe zone in the center. After a while, a « Draupnir »-type attack is launched (a wave you’ll have to jump over).
Overall fight strategy
There’s a strategy that works very well on this fight and is surprisingly simple: an Aede (Chanter) and a Cleric with 2 DPS and 1 Tank. With this composition, you can tank ALL the attacks. You just need to stay stacked as 5 at all times to avoid the boss’s mechanics (red stack and purple circle).
Mechanic 1 : Red Laser ~80% / (~30% / ~15% HP)
A player gets a red eye above their character: they are targeted by the laser. They must move to one side of the safe zone, then, at about 90% of the boss’s cast bar (or when the attack stops), dash into the safe zone.
Mechanic 2 : Main Mechanic ~60% HP
The boss teleports to the center of the map, back turned to the map entrance, and the players are teleported to the corners of the map.
You’ll have to reach the center of the map as fast as possible while dodging the attacks.
One player gets a yellow zone around their character; the players must pack into the zone at the end of the mechanic.
The strategy is to get into the boss’s melee as fast as possible, then rotate around it clockwise, between the two pizzas.
Tips: – For melee classes: run to the zone and, when the first circle explodes, use a dash to get straight into melee. – For classes without a dash: run to the edge of zone 2, wait for it to explode and use your shift to pass into the zone without taking damage.
- If you play a meta comp (Aede, Cleric), you can also face-tank all the attacks and hit the boss during this mechanic.
After this mechanic, the boss will ALWAYS do the following attacks:
Bombardment: the boss fires 5 projectiles at the players, leaving damage zones on the ground. You’ll then have to split.
Laser: a wide 180° cone that hurts a lot. You’ll have to go behind the boss, where there’s a small cone that doesn’t hurt.
⚠ Warning: for the entire duration of the mechanic, there will always be the purple circle to manage!
Mechanic 3 : Split Map ~40% HP
The boss teleports to the center of the map and splits the map into 4. You’ll then have to regroup on one of the sides near your arrival zone.
After this mechanic, the boss will ALWAYS do the following attacks:
Dash: the boss jumps on a player. The attack doesn’t do much damage, it’s better to stay packed.
Bombardment: the boss fires 5 projectiles at the players, leaving damage zones on the ground. You’ll then have to split.
Cross: double cross attack (more details in the attacks section).
Then it will do either:
Laser: a wide 180° cone that hurts a lot. You’ll have to go behind the boss, where there’s a small cone that doesn’t hurt.
Stack: stay packed in the zone (more details in the attacks).
Mechanic 4 : Last mechanic ~20% HP
The boss teleports to the center of the map and 4 monsters appear randomly on the map.
One player gets a red eye and is targeted by the boss.
You must line up the boss’s attack with a monster so it kills the monster. Don’t try to dodge the damage, you must take it.
The boss always uses the same attacks cyclically, and the main mechanics happen depending on the boss’s health bar. Depending on how long you take to kill it, it may do a different number of attacks.
For the main mechanic, I recommend splitting on the map like this.
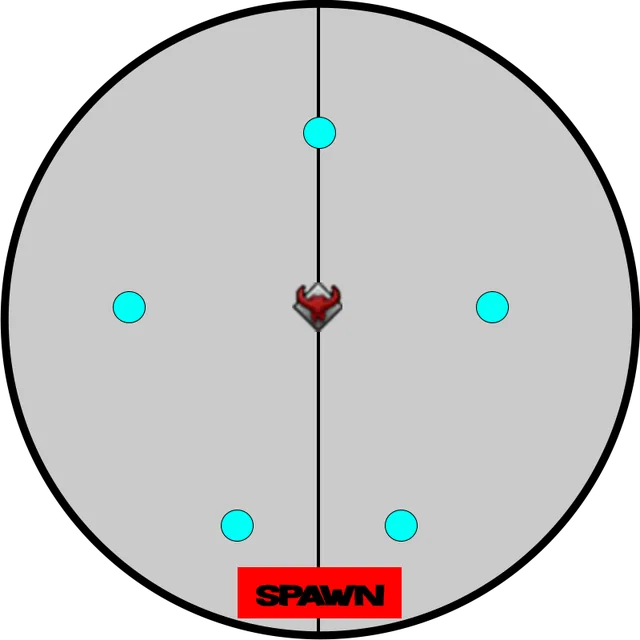
Two players handle the right, two players the left, and one player the back of the map (looking toward the spawn).
Fight strategy
You need a good healer, and ideally an Aede (Chanter) on top. A tank isn’t strictly necessary, but it’s always nice. A good composition would be: Aede, Cleric, Gladiator, 2 Ranged DPS.
The Ranger has an ability that can solo a mechanic; it makes this fight easier, but it’s not mandatory.
In this fight, the boss uses its attacks in the order shown here; depending on your damage, it will do them more or less often between each main mechanic.
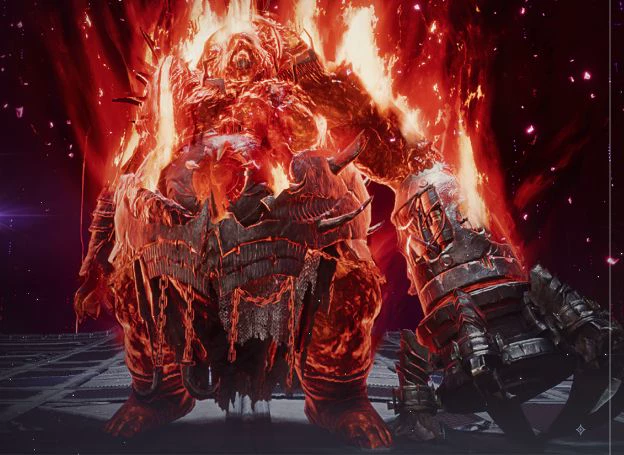
Attack 1 : Scythes
The boss does scythes behind it, over a 180° angle.
Attack 2 : Draupnir
The boss dashes to an edge of the map, then targets a player who gets a red eye above their character.
Once the attack lands, the boss pulls its weapon from the ground, causing a damage wave similar to the « Draupnir » boss. You’ll have to jump over it.
Attack 3 : Red Scythes
The boss chains two red attacks: one to the left, one to the right. These attacks are RED: they can’t be dodged (even with a perfect) nor blocked.
Attack 4 : Orbs
The boss says a voice line and two orbs appear randomly on the map. You must go to the foot of the orb and jump to collect it.
Attack 5 : The scythes
The boss spawns scythes on players at a certain distance from it. They aren’t dangerous as such, but can easily kill you if you take another mechanic during the scythes.
Attack 6 : Lasers
The boss spins its scythe in one direction and lasers come from that side; in addition, the boss does an attack in the 8 main directions.
Attack 7 : The eyes
This attack only appears after the second mechanic.
The boss disappears and 3 eyes appear randomly. You’ll have to: Red Eye : look toward it. Blue Eye : turn your back to the eye. You can’t get the same eye 3 times: you’ll necessarily get Red/Blue/Red or Blue/Red/Blue.
At the end of the attack, you’ll have to run to where the boss was: the safe zone will be there.
Mechanic 1 : Main mechanic (~80% HP)
This mechanic has several steps. 0- Take the placement shown in the article’s overview. 1- The boss teleports to the center of the map; a purple zone that deals damage appears under it. 2- Ghosts start appearing all over the map and meteor-type AoEs fall everywhere. 3- A few seconds later, lasers come from the spawn (they hurt and stun). 4- Light triangles appear and go around the map.
You must kill all the ghosts while making sure no monster touches the light triangles, otherwise:
- Fear Ghost (7 hits): it will fear the whole map.
- Destruction Ghost (2 hits): it will deal damage to the whole map.
Then, once you reach the safe zone behind the boss, you’ll have to go to where the boss was: a zone that improves healing received will appear. The healer must then burn all their heals to keep the group alive.
Mechanic 2 : Main mechanic 2 (~50% HP)
Exactly the same mechanic as before, with a small variation: the eyes attack at the end.
When the light triangles reach the halfway point, there will be, at the safe zone, 2 times 1 eye. They can be any color: Red Eye: look toward it. Blue Eye: turn your back to the eye / don’t look.
Mechanic 3 : Last Mech (~20% HP)
The boss teleports to the center and huge red triangle-type AoEs appear on the players, along with small meteor-type AoEs.
Players must pack together, usually toward the spawn. When the triangles lock in, you must dash to one side and run toward the crystals that have appeared.
You’ll then have to hit a crystal IN MELEE to get a few seconds of invulnerability and tank the damage waves.
There’s no point killing 400 crystals: 2 are enough. The first as soon as possible, the second a few seconds later (it resets the bonus, it doesn’t extend it).
Phase 1
The fight is fairly long, with several phases. Many attacks and mechanics can be skipped with a lot of damage, but the fight stays relatively simple.
It’s split into two phases, with a transition at 50% HP. The basic attacks and mechanics change, with new additions. There will be placements to do, explained directly in the corresponding mechanics.
In this fight, the boss uses its attacks in the order shown here; depending on your damage, it will do them more or less often between each main mechanic, and some attacks may potentially never appear.
Phase 1
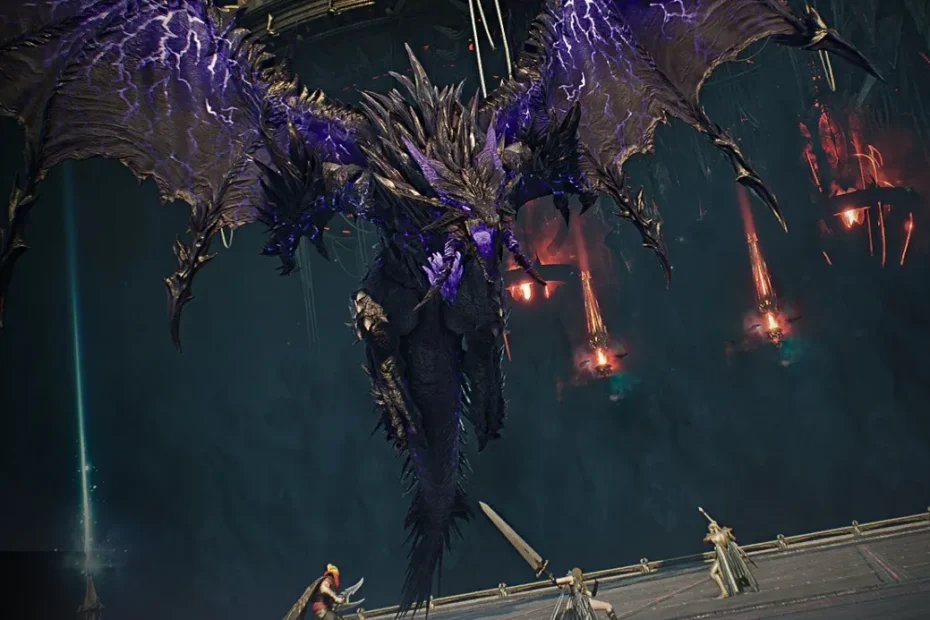
Attack 1 : Cone
A wide damage cone on the boss’s target. You must dodge it by going to one side.
Attack 2 : Laser
This attack is fairly rare, only visible if you have low damage. The boss charges a laser on its target; it can then stay still or rotate while firing the laser.
Attack 3 : Draupnir
The boss rises and strikes the ground with both paws; each paw makes a wave you’ll have to jump over.
Attack 4 : Meteors
The boss flies up and meteors fall on the map. You can dodge them by running or block them.
Mechanic 1 : Red Eye
As long as you don’t bring the boss to the health threshold (50%) that triggers the next mechanic, it will do this mechanic on a loop.
This mechanic has several steps:
First step – the orbs: The orbs appear randomly outside the arena. The blue orbs must be collected the classic way (with a jump at the foot of the orb). The red orb will appear in front of the boss (behind the person tanking it). It must be intercepted with a BLOCK.
Second step – the red eye: This mechanic is long…
1- The map shrinks and one player gets a red eye on their character; they’ll be the boss’s target until the end of the mechanic, or until they die (if they die, another player takes the red eye).
2- The boss jumps; tornadoes shoot from the boss outward. They deal damage and launch players into the air. At the same time, blue orbs appear and you’ll have to collect them.
3- Ludra turns toward the player targeted by the red eye and does a huge damage cone.
4- The boss slams the ground and yellow zones follow the players. This mechanic is brutal, especially with an undergeared group. I recommend using your defensive CDs (Tank Shield, Aede…) to mitigate the damage. Melee classes can also block the attack; ranged will have to do a perfect dodge.
5- Ludra jumps again, with the tornadoes and the blue orbs.
6- The boss redoes the attack on the player targeted by the red eye.
Last step – get out
The boss does a huge attack covering the whole center; you must already be ready to leave, then dash out as soon as the outer zone is done.
If you’re the red eye target, stay close to the boss and call yourself out on voice. Try to turn the boss toward a zone with no blue orbs. If you play a class like Assassin or Ranger, you can use your backstab to dodge the attack. All ranged classes can also hit during the last step by getting close to the damage zone.
When the boss lands again at the end of this mechanic, it will do a special attack: CROSS. You’ll have to avoid the boss’s cardinal points; go on the diagonals instead.
Mechanic 2 : Shugo
The boss starts with a meteor mechanic, then disappears into a portal. The map changes, with tiles appearing.
Meteors fall on the players, which lights up the tiles. You must find the safe zone by uncovering as many tiles as possible. The yellow zones of the meteors follow the players before stopping. You have two options: 1- You run in a circle and leave the tile when the zone locks in. 2- You stay still and, when the zone is charged to 80%+, you do a shift dash in a direction to move to the next tile.
Meanwhile, the boss does 2 lasers that one-shot in the middle tiles.
The strategy here is to start with the middle tiles to clear them before the laser.
Melee characters handle the inner tiles while ranged do the outer tiles. Obviously, it’s hard to do it « perfectly », so just do your best. Here’s a « perfect » placement for 8 players (the others can go anywhere).
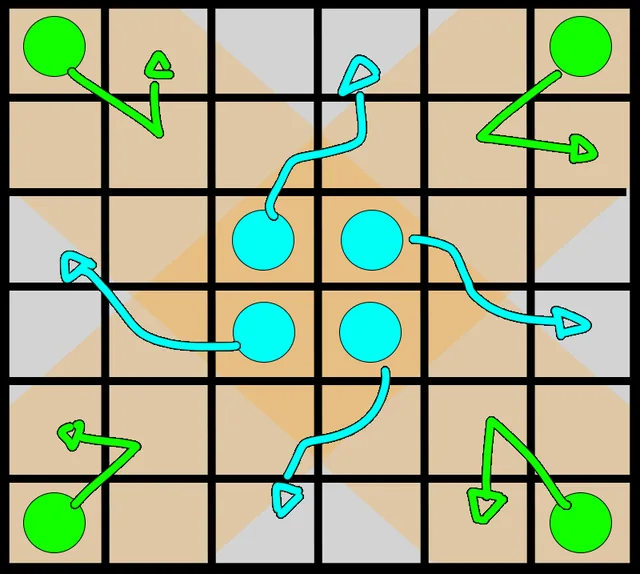
Once the tile is found (it lights up brighter than the others), all players must go inside it before the giant meteor explodes. Once the safe zone is reached, the boss is knocked out for a few seconds, giving a big damage window.
You can only take 2 tiles before the laser hits the middle tiles; never try to place a meteor before the laser, you won’t have time. Also, when the safe zone is found and the laser is about to fire, wait for the laser to finish before going into the zone. Finally, watch out for other players’ meteors when you go into the safe zone: many players die that way.
Attack 1 : Draupnir
Same principle as in phase 1, with melee AoEs.
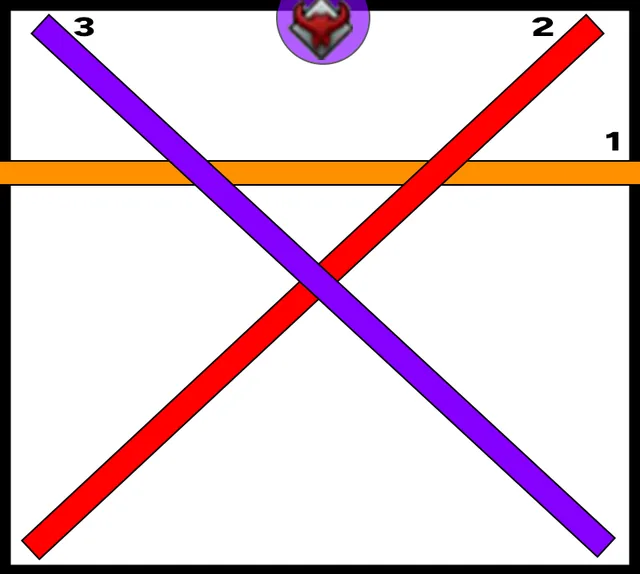
Attack 2 : Zikel
The attack is recognizable because Ludra flies far away from the arena.
Same attack as on the nightmare boss « Zikel »: Ludra shows a zone, this zone explodes then becomes a safe zone. So you must get close to the zone, then enter it once it has exploded.
The mechanic happens 3 times, always at the same spots.
Attack 3 : Laser
Only present if you lack damage. The boss charges a laser; either it stays still, or the laser has a direction.
Attack 4 : Lightning x2
The attack is recognizable because Ludra tilts its head to the side then strikes from the other side. Lightning appears on the players, twice in a row. Dodge it at all costs. Melee characters can block.
Attack 5 : Safezones
2 consecutive attacks, with safe zones always in the same places.
Mechanic 1 : The orbs
The boss regularly does the orbs mechanic. There will be 5 orbs each time: 2 behind and 3 in front. The front middle one will be red and will require a block. The others will be always blue and can be collected the classic way.
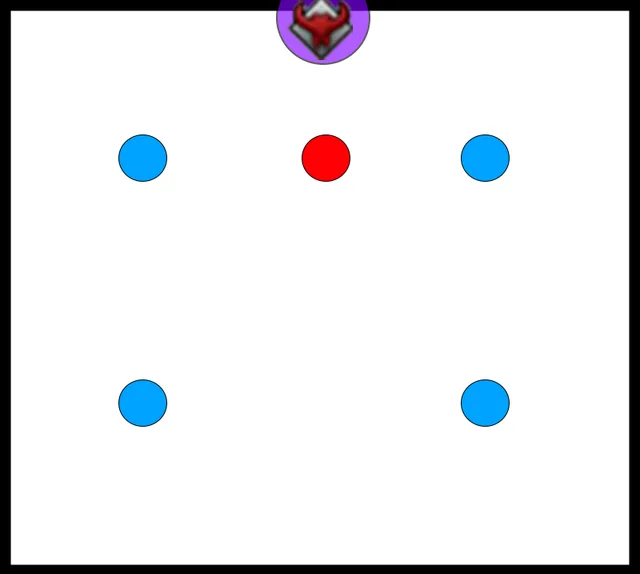
During this mechanic, the boss does a Draupnir.
Mechanic 2 : The colors (~35% HP until the end of the fight)
It’s a restrictive but easy mechanic.
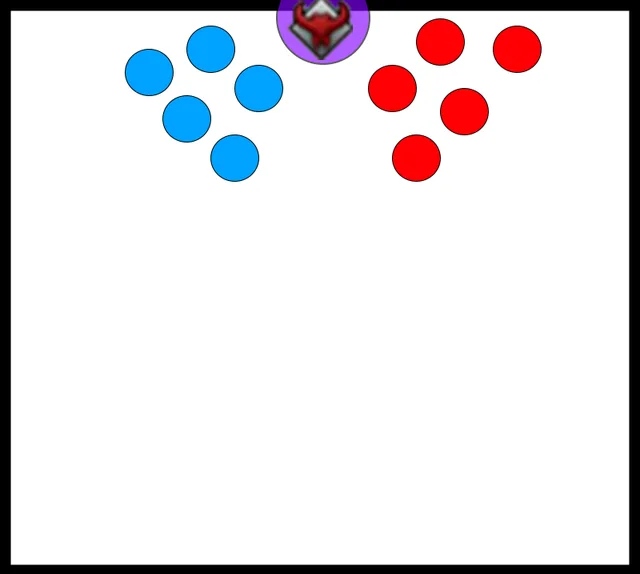
The boss spawns large orbs in its paws, and players then get 3 small orbs, red or blue, spinning around their character.
Generally, we use the same layout as the colors shown by the boss, that is: Blue on the left Red on the right
Mechanic 3 : Shugo (~25% HP)
Exactly the same principle as the Shugo mechanic in phase 1, except that instead of the lasers, there will be several Draupnir waves during the mechanic. Keep the same placement too.
Mechanic 4 : Color zones (~10% HP)
Zones appear; depending on your color, you must get close to a zone of the same color, then wait about 1.5s on the boss’s cast bar to enter the zone. You can’t enter the same zone with several players.
Conclusion
Feel free to share this article around you to help with the site’s referencing, it’s important! 🙂